Accounts
Manage your account, team members, and preferences
Overview
Understanding account settings and team management.
An Account represents a company or organization in the system. Each Account has its own shipping data, team members, billing, and branding. You can belong to multiple Accounts and switch between them.
What is an Account?
Think of an Account as a workspace for a business or organization. All data within an Account is separate from other Accounts:
- Shipments and orders are Account-specific
- Team members are invited to specific Accounts
- Billing and subscriptions are per Account
- Company logo and branding are Account-level settings
- QuickBooks and Shippo integrations are configured per Account
Managing Your Account
| Field | Format | Description |
|---|---|---|
| Company Information | Section |
Company name, logo, and branding that appears on shipping documents. |
| Team Members | Section |
Invite users, manage permissions, and remove team members from your Account. |
| Billing & Subscription | Section |
Manage your subscription plan, payment methods, and billing history. |
| Integrations | Section |
Connect QuickBooks, Shippo carrier accounts, and other third-party services. |
Multiple Accounts
You can belong to multiple Accounts, which is useful for:
Managing Multiple Businesses
Create separate Accounts for each business you own. Each Account has its own billing, team, and data.
Working with Clients
Invited your clients to help manage their shipping without granting QuickBooks Online access.
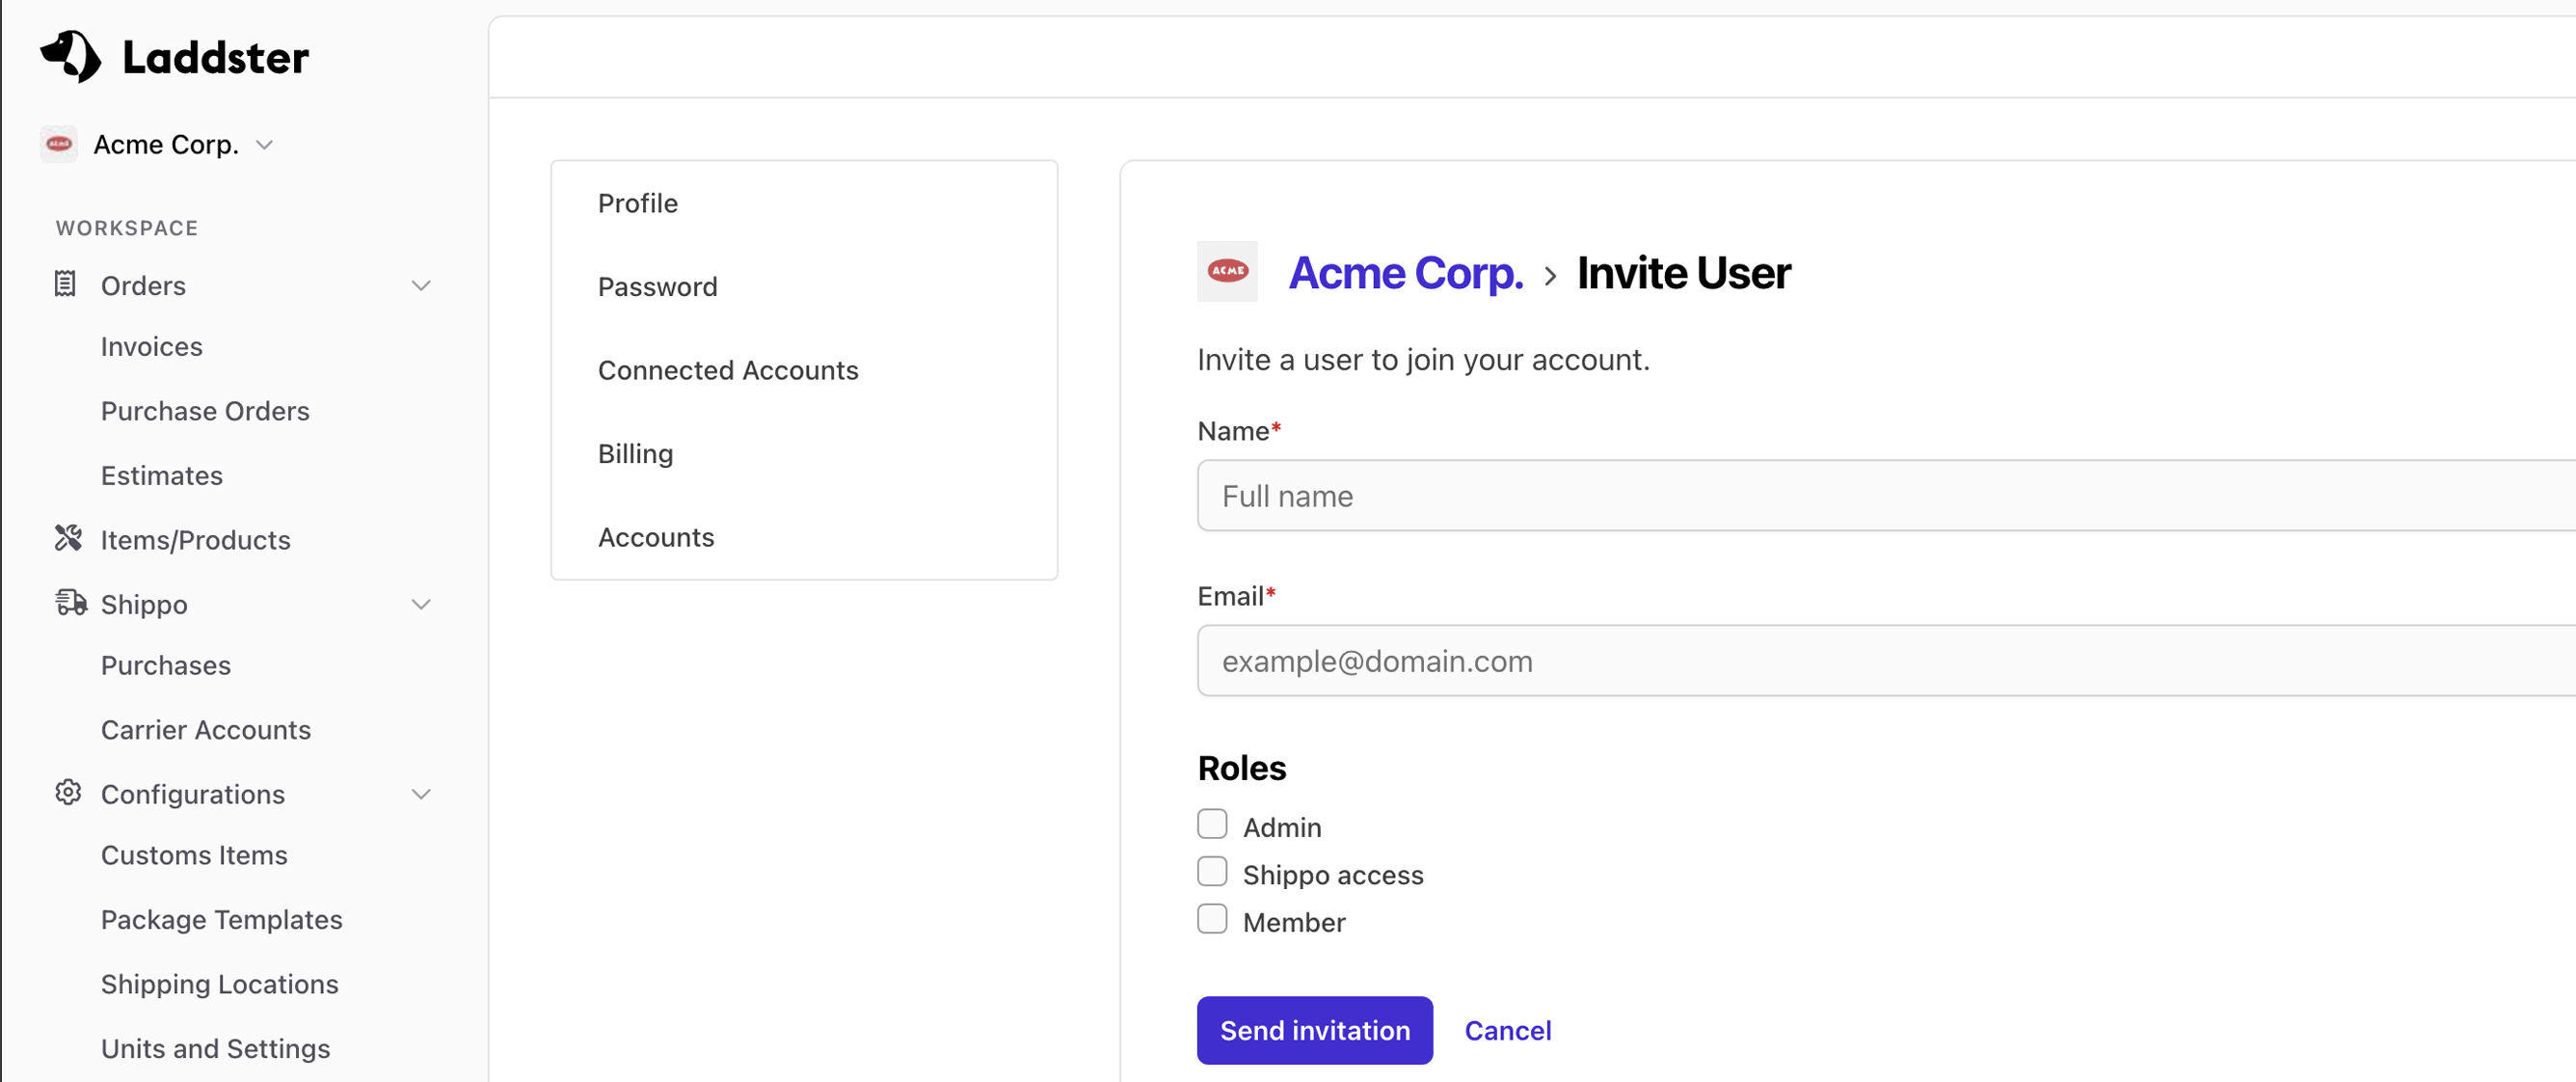
Inviting Users
Add team members to your account and manage their access.
Add team members to your Account so they can collaborate on shipments and orders. Each user has their own login credentials but shares access to the Account's data.
How to Invite Users
Navigate to Account Settings
Click on your account name in the top navigation, then select "Account Settings"
Go to Team Members
Find the "Team" or "Members" section in your account settings
Send Invitation
Enter the team member's email address and click "Send Invitation"
They Accept & Join
The invited user receives an email with a link to join your Account
Managing Account Users
Once users have joined your Account, you can:
- View all active Account users and their roles
- Resend invitations if they weren't received
- Cancel pending invitations that haven't been accepted
- Remove users who should no longer have access to this Account
User Roles & Permissions
Each Account user has a role that determines their level of access:
| Field | Format | Description |
|---|---|---|
| Owner | Role |
Full access to all features including billing, account deletion, and user management. Automatically has Shippo access. |
| Admin | Role |
Can create, view, edit, and delete all data. Can manage account settings and invite users. Cannot access billing or delete the account. Automatically has Shippo access. |
| Member | Role |
Limited access - can view most data and perform basic operations like creating/deleting line items. Cannot update items or line items without Shippo access. Cannot access account settings or invite users. |
Shippo Access Permission
Shippo access is an additional permission that controls whether a user can interact with your Account's connected Shippo account:
- Get shipping rates from Shippo carriers
- Purchase shipping labels
- Request refunds for labels
- View and manage carrier accounts
- Access Shippo transaction history
| Field | Format | Description |
|---|---|---|
| Owner & Admin | Access Level |
Automatically have Shippo access. Cannot be disabled. |
| Member | Access Level |
Shippo access must be explicitly granted. Can be enabled or disabled per user. |
Company Logo
Customize your account with your company logo.
Add your company logo to personalize your Account. Your logo appears in the application header and on shipping documents like packing lists and commercial invoices. Each Account can have its own logo.
How to Upload Your Logo
Go to Account Settings
Click your account name in the navigation, then "Account Settings"
Find Company Logo Section
Look for the "Company Logo" or "Branding" section
Upload Image
Click "Choose File" or drag and drop your logo image
Save Changes
Your logo will appear immediately in the header and on future documents
Logo Requirements
| Field | Format | Description |
|---|---|---|
| File Format | Requirement |
PNG, JPG, or SVG. PNG with transparent background recommended for best results. |
| File Size | Requirement |
Maximum 2 MB. Smaller files load faster. |
| Dimensions | Recommendation |
At least 200px wide for clear display. Horizontal logos work best. |
| Aspect Ratio | Recommendation |
Wider than tall (e.g., 3:1 or 2:1) fits better in the header. |
Where Your Logo Appears
Once uploaded, your company logo will be displayed in:
- Packing list PDFs
Updating or Removing Your Logo
You can change your Account's logo at any time by uploading a new image. To remove your logo completely, use the "Remove Logo" or "Delete" button in the account settings.
Address Validation Limits
Understanding how address validation works and managing your usage.
Address validation helps ensure accurate shipping by verifying addresses before you create shipments. This feature is configured per Account, and usage limits are tracked at the Account level.
How Address Validation Works
When you enter or import an address, the system can automatically validate it to:
- Verify the address exists and is deliverable
- Standardize formatting (e.g., "St" vs "Street")
- Fill in missing information like ZIP+4 codes
Usage Limits
Address validation limits are based on your Account's subscription plan:
| Field | Format | Description |
|---|---|---|
| Trial Accounts | Limit |
50 validations per month during your trial period. |
| Subscribed Accounts | Limit |
500 validations per month with an active paid subscription. |
| Usage Reset | Schedule |
Monthly limit resets on your subscription renewal date. |
| Over Limit | Behavior |
Additional validations beyond your monthly limit will be blocked with an error message. |
Managing Your Account's Usage
You can view your Account's current address validation usage in the Account settings:
Check Usage
Go to Account Settings > Address Validation to see how many validations your Account has used and how many remain.
Increasing Your Limit
If your business regularly needs to validate more than 500 addresses per month, please contact support to discuss higher-volume plans for your needs.